Friday, March 5, 2010

Lucky Duck Card using Cricut Songbird and Everyday Paper Dolls

Happy Friday! I think this is my favoriet day of the week!
Today I have a card for you that is a paly on words and fits right in for St. Pat's

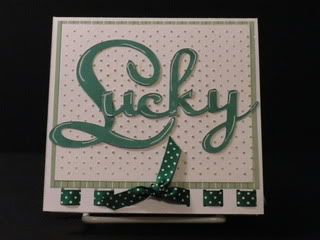
The card is 5 1/4 by 5 1/4. I used white card stock and scored it down the center. I used a double mat with a green stripe being the bottom and a white being the top. I cuddle bugged the white with swiss dots and then used Range ink to give the embossed section some color--and of couse inked the edges.
I used a fiskers edge punch for the ribbon hole placement. I love this, I used two small pcs of ribbon that were left over from another project--then I joined them with a knot. Lucky was cut from the Cricut Songbird font, which remineded me of the Lucky Jeans logo. To give the letters some diminsion, I tried to ink the edges with a white SU pad which was way to big for the job. Still not happy I took my white gel pin and added some 'shadow' which helps the letters pop!

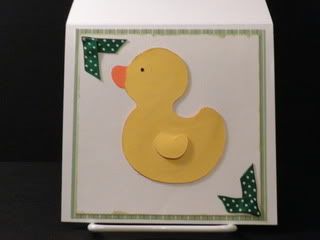
The inside is simple--I used the same papers as the front of the card and mitered a couple of bits of ribbon in the corners. The rubber ducky was cut from the Cricut Everyday Paper Dolls. I cut it in both yellow and orange so the beak would look like a real rubber ducky. I just cut the yellow beak off and used my black pin to color in the eye.
Have a great weekend!
Bryan

Wednesday, March 3, 2010

Bucket of Gold using Songbird Cricut Cartridge

Hope your Wednesday is off to a great start. Today I have a pretty easy project using the Songbrid Cartridge--I really love this font but wanted to show something with the cartridge what had nothing to do with birds--so I used a cut that looks like a sign--there was a bird on top but I cut used Kraft paper and then stamped the sign with a wood grain rubber stamp. I then cut the word GOLD out of shiny gold paper and glued it to the sign--I over lapped the letter to give it a faux welded look. The bucket is from Michale's dollar bins and the shamrock ribbon was only $1.50. I cut the ribbon into 6" strips and looped them along the handle (wanted to tie in St. Patrick's Day). I then got Hersey Nuggets (wrapped in gold paper right out of the bag) and filled the pail--thus the pot of gold at the end of the rainbow! I am going to sit this on my desk at work, and chocolate always brings in the visitors!

Monday, March 1, 2010

March-Designers Calendar and Animal Kingdom Cricut Cartridges

As Promised here is the Calendar I got from Tall Mouse at CHA (check tallmouse.com if you want to order)
This month I got a little more creative as March come in like a lion and out like a lamb. I used magnets to the special day call outs--
This month we have St. Pats on the 17th, then the start of Spring, Palm Sunday, and Passover. I have to start working on April as I am going to be out of the country the first couple weeks of April--I better get busy!

and here is a look at the back of one of the magnets!


And if you have not checked out the new look, new name, and amazing projects over at the now 'Everyday Cricut' go on over--they have a fresh take and an amazing amount of BLOG CANDY this week (http://www.cricutholiday.com)!!!!
Have a great Monday
Bryan

Friday, February 26, 2010

Cricut Celebrations Birthday Present Card

TGIF!!! Today I have a birthday card using Cricut Celebrations. I love presents so I made a layered present with a light weight chip board center to add some stability to the overall card. The card is a 4 1/2 square card with a top fold. The base is a bright yellow that just made me think HAPPY BIRTHDAY!

Inside I used a double layer mat, stamped the solid layer using an inkadinkado stamp that reads "blowing you birthday wishes." I also added candles that I stamped and used the Stamp-N-Foil I fell in love with at CHA. Using a white background makes the colors really pop and adding a couple pop dots makes them stand out just enough!

Here is a detail of the Stamp-N-Foil bling

I also added faux stitching to the ribbon to give it a bit more definition once I stared at it for awhile. It was just the right touch it needed.
Well hope you have a great weekend! I am so glad you stopped by!!!
Make it a great one-
Bryan

Wednesday, February 24, 2010

Welcome to the Neighborhood Card

OK--NYC was cold and rainy! I love coming home! So today's card is pretty simple. What is so great about the card is that even though it is simple--because it's a multi fold card it really packs a BIG PUNCH! Thanks to Joy over at Obsessed with Scrapbooking and Holiday's with the Cricut for sharing the fold instructions for the base card. I had this idea to make a card that looks like a door and when I found the 'welcome' mat in a DCWV (SONGBIRD) stack it was fate! The door even has a peephole and a door knob!!!!


Here are the measurements if you need them:
card base is 11" long by 4 1/2" wide
base of door (larger brown section in picture) is 7" long by 4" wide
middle section of door (cream polka dots) is 3" long by 1 1/2" wide
small section of door (light blue herringbone) is 2 1/2" long and 1" wide
placement on card is simple--1/4" over and 1/4" down or up from each corner and this is the same for all layers.
Peep hole is placed 2" over and 1" down
Door knob is placed 3 1/2" from either top or bottom and 1/2" in
welcome mat measures 2 1/2" long by 4" wide

Thanks for taking the time to take a look and remember I love to read the comments you all leave! Have a great day.
Bryan

Monday, February 22, 2010

Fast and Easy Scrapbook Pages!

Good Monday Morning--I am on my way to NYC but wanted to get this posted before I left. While at CHA I came across a company called embellish it! I ended up spending a ton of Monday and buying a ton of paper (shocker I know). One of the items I bought was a page kit. I love page kits because they are a great solution to every scrappers biggest issue-TIME! I just loved the look of this Christmas layout, but they have tons more as well as paper and embellishments that all match up. Check it out at http://www.embellishonline.com/


The kit comes with everything you will need to complete the layout--all you do is add your fav glue or tape and your set. It only took me 30 minutes start to finish but I spent most of the time trying to decide what to do with the pearls--
Have a great day
Bryan

Saturday, February 20, 2010

New Scrap Paper Stacks!!!!

Really how many does one person need? In my case I could never have to much paper! I have gotten so much recently that I have to buy another bookcase--sick I know!
Here is a preview of a few of the new stacks I simply could not resist.
I got the all at Michaels or Joann's! Enjoy
 
Designed by Lena Graphics by Melany